Archive for the 'Windows Details' Category

How to delete GPT Protective Partition

Posted in Windows Details on December 10th, 2009

I loaned a portable USB 1 TB drive to someone recently and they accidentally horked it up pretty well. They attempted some fix up on it but when I mounted it on my system it did not appear in the list of disks under My Computer but it was listed as a device off the USB hub.

Opening Computer Management under XP Pro the disk was listed as a “GPT Protective partition” and no options were available for doing anything to it under the Disk Management applet. A GPT partition is a GUID Partition Table and is usable by Macs and Windows Vista and greater — but not XP which is what what I’m running.

A quick search found this procedure:

In Windows XP Professional, if you cannot access or modify GPT disk, you can convert a GPT disk to MBR by using the “clean” command in the command line application DiskPart, which will remove all data and partition structures from the disk.

1. Go to the DOS command line (click on “Start Menu”, then “Run”, type in “cmd” in textbox, and hit “OK”)

* Type in “DiskPart” in command line.
* Type in “list disk” in command line to show all disks in this machine.
* Use “select” to set the focus to the specified partition, for example “select disk 1″.
* Use “clean” command to remove GPT disk from the current in-focus disk by zeroing sectors.

2. Go back to Disk Management, the disk should be “unallocated” now. Right click on disk info, choose “Initialize Disk” then format it.

Warning: Duh: This command will of course erase all data on the disk, but if you got here, you couldn’t access it anyway!

Windows Command Line stuff

Posted in Essential Tools, The Art of Programming, Windows Details on July 10th, 2009

Creating scripts to automate administrative or programming build tasks is GOOD. It centralizes details and reduces errors.

I find I need to re-learn DOS (and *nix) command line stuff every few years and then I completely forget how to do it and have to learn again.

Resources that I find useful:

The Windows Command Line

Microsoft Windows XP – Using batch files

NTFS tricks and the full c: disk

Posted in Campfire Stories, Windows Details on March 9th, 2009

In the last week or so I’ve hit a point on my workstation where booting and running everyday apps has just slowed to an unbearable crawl.  This happened to me before but I switch machines enough that I usually avoid the issue by, well, switching machines.

This time I think I have to actually stop and fix it — because I won’t have a new machine for another week or so.

Dang. Forced learning.

DiskThrash

Using perfmon it is clear the disk is thrashing. Note the top two counters,  pages/sec (yellow) and Average disk access queue (blue)  are pegged but CPU (green) is mild.

This is with the machine basically idle. I have the usual suite of things like Google Desktop and Tortiose SVN running so I’m not shocked things are accessing the disk but the machine is almost unusable and it was running fine about a month ago. No, I checked, I don’t have a virus. In my life the problem has never been “it’s a virus.” It has always been “I did something stupid.” I guess viruses also fall into that I-did-something-stupid bin …

I’m sure some of you are ahead of the story and saying “has he checked his disk space?” Turns out I have almost 21% free space on a 320 GB drive. Is that a problem?

Yes.

This is a Windows XP system with NTFS on the C: drive. I actually have couple more 320 GB drives on this machine but they’re basically empty. Why are they empty? Dumb reasons. I have a bunch of alpha and beta quality projects going, each of which has all kinds of massive data sets and each of which the developers insist “install it on the C: drive — it doesn’t work quite right in other locations.” Sigh. They are mostly not my developers so I can’t explain (or yell) to them HOW STUPID IT IS TO WELD YOUR APP TO THE C: DRIVE.

But why is an 80% full NTFS partition a problem? When I started this I actually did not know why but I’ve known for years that NTFS disk performance goes to crap once you get north of 70% full or so — but why? I found some of the best information on this topic on this page by Mitch Tulloch at O’Reilly Windows Devcenter.

Based on Mitch’s descriptions, my best theory is that it’s a combination of the Master File Table (MFT) getting fragmented as well as space needed for the pagefile. This hints at two fixes: move the paging file and clear some disk space.

Getting into the disk management applet,

Diskmanager

I saw that Dell helpfully left me a 3.11 GB partition that was unused so I formatted it FAT32, declared a 3067 MB page file there, and removed the one on the C: drive.  Note: Ideally the pagefile partition would be on a physically separate disk but I’m working with what I have.

After a reboot I have:

Disks

Performance is much better — the machine now thrashes for about 3 minutes after boot and login as opposed to 15+ (!) minutes before moving the pagefile location.

However, I’m at 79% full (down from 82%) on the C: drive so I’m still in serious risk of MFT fragmentation so let’s clean up the disk.

Gina Trapani wrote this very helpful post about using WinDirStat to see what’s using space on your disk.

WinDirStat is a really cool tool!  I’ve learned about (and subsequently forgotten) this tool several times. I have on the order of 1,000,000 files on this system so the graphical tool to help me home in on the disk hogs is really helpful.

windirstat

After some quality time marvelling at all the cruft I had accumulated on my machine (why did I have two cygwin installations? Why did I have one? ) I moved or deleted  about 60 GB of stuff and got to around 38% free and the machine is running much better now.

The scary thing is that I absolutely “need” the 180 GB in use now. It was only a few years ago that 30 GB drives were ok…

A simple WPF demo and architecture discussion

Posted in Windows Details on April 24th, 2007

This post is based on a short demo/talk I gave at Vertigo recently.

I have two main goals in this discussion:

  • How VS2005 handles WPF projects/apps (showing some Blend / VS2005 gotchas)
  • A way to look at the role of XAML in WPF architecture

Petzold books

Charles Petzold’s books have always been a huge help to me in getting all the nitty gritty details in Windows UI technology. I started my Chuck P. habit way back with his Programming Windows book. The Book for Win32 Windows programming. Ok, I do have other books too but this is the one I’d want if I was lost on a desert island alone with a c-compiler…

More recently, Petzold has written authoritative .NET WinForms books and I started to notice a trend. Especially in Programming Microsoft Windows Forms, his .NET 2.0 WinForms book, Petzold really pushes a code-everything-yourself approach as opposed to using any of Visual Studio’s “helpful” tools. His point: if you do not understand the code the various visual designer/code generators in VS create, you really do not know what is going on.

I see this as just another statement of the well-known Weasley’s Law:

Never trust anything that can think for itself

if you can’t see where it keeps its brain!

Arthur Weasley — Harry Potter and The Chamber of Secrets

I’m going to focus this very small discussion on how XAML fits in to the WPF dev process and WPF architecture and point out a few gotchas in the current WPF dev tool set.

The WPF dev process

I’m going to step through building a baby application modeled closely on the sample application Microsoft provides at MSDN in Get Started Using Windows Presentation Foundation but I’m going to walk through it highlighting aspects Petzold points out in his new WPF book Applications = Code + Markup.

Prerequisites

If you want to build and execute the demo code you will need a working WPF dev environment which requires the following: the Microsoft .NET Framework version 3.0 and the Windows Software Development Kit (SDK), Visual Studio 2005 (C# Express ok), Visual Studio 2005 extensions for .NET Framework 3.0 (WCF & WPF, November 2006 CTP or newer), and Microsoft Expression Blend (RC Version or greater).

First let’s play with a trivially simple WPF project. Source code here.

Step 1

We start Start with an empty WPF project in VS2005 which I’ve named WPFDemo.

In Solution Explorer, click the Show All Files button.

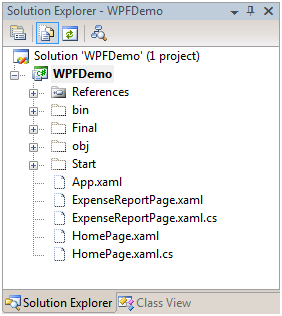
Select the files: (all the code files in the Step 1 folder)

App.xaml

ExpenseReportPage.xaml

ExpenseReportPage.xaml.cs

HomePage.xaml

HomePage.xaml.cs

Right-click on them and Include In Project.

Look at App.xaml:

    1 <Application

    2   xmlns=http://schemas.microsoft.com/winfx/2006/xaml/presentation

    3   StartupUri=HomePage.xaml>

    4 </Application>

App.xaml declares the application starting point. So let’s try to build. Assuming you followed the steps exactly you will see the following build error:

WPFDemo.exe does not contain a static ‘Main’ method suitable for an entry point

This is because by default when App.xaml was included by Visual Studio its Build Action was set to Page.

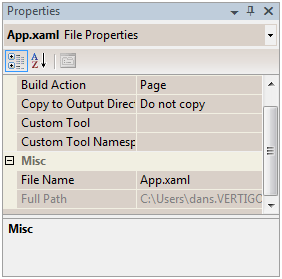
Select App.xaml and change its Build Action to Application Definition. Confirm that the application now builds and runs correctly.

Note: App.xaml is the most common name for this file but there’s nothing special about the name App.xaml. What’s important is its content and that it is configured as the Application Definition. Since the error message we got above implies this configuration has something to do with the Main() method it should also make sense that an application can only have one file configured as the application Definition.

In the steps above I’ve enacted discussion that may be found on pp. 479-481 of Petzold’s Applications = Code + Markup.

Where’s Main()?

After a quick examination of all the files we included in the project so far you should be asking about Main() – like, where is it? App.xaml defines the entry point to the application and if you dig into the generated files for the application you will find an App.g.cs file in the obj\Debug folder:

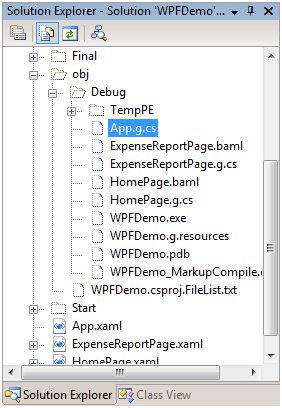
Examining this file we find a Main():

   33     /// <summary>

   34     /// GeneratedApplication

   35     /// </summary>

   36     public partial class GeneratedApplication : System.Windows.Application {

   37 

   38         /// <summary>

   39         /// InitializeComponent

   40         /// </summary>

   41         [System.Diagnostics.DebuggerNonUserCodeAttribute()]

   42         public void InitializeComponent() {

   43 

   44             #line 3 “..\..\App.xaml”

   45             this.StartupUri = new System.Uri(“HomePage.xaml”, System.UriKind.Relative);

   46 

   47             #line default

   48             #line hidden

   49         }

   50 

   51         /// <summary>

   52         /// Application Entry Point.

   53         /// </summary>

   54         [System.STAThreadAttribute()]

   55         [System.Diagnostics.DebuggerNonUserCodeAttribute()]

   56         public static void Main() {

   57             XamlGeneratedNamespace.GeneratedApplication app = new XamlGeneratedNamespace.GeneratedApplication();

   58             app.InitializeComponent();

   59             app.Run();

   60         }

   61     }

The #line 3 directive causes any compile error occurring here to be directed to the file indicated: back to the XAML file. The #line default, #line hidden directives restore error indication back to normal. These directives also affect debug step-through.

The key takeaways from this example are:

  • VS2005 creates all kinds of generated files you should be aware of.
  • Even a “pure XAML” app involves additional generated code and files.
  • VS2005 patched for WTF is not (yet) fully XAML aware.

Obviously it would be great if we could wait for the next release of Visual Studio codenamed “Orcas” (Here’s a great site by Scott Guthrie all about Orcas). But here at Vertigo we’re delivering WTF applications today so we need to be aware of the issues – and build anyway.

I’ll jump ahead by simply pasting in more UI content to the application and demonstrate a typical but very simple Blend/VS2005 development scenario. Source code here.

Step 2

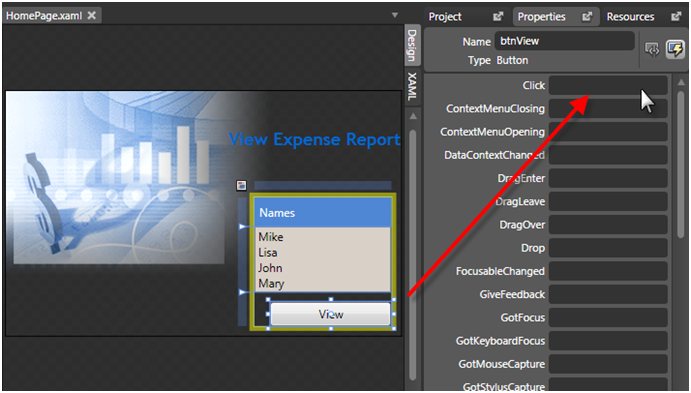
Without making any changes to the structure of the app but adding UI code we get:

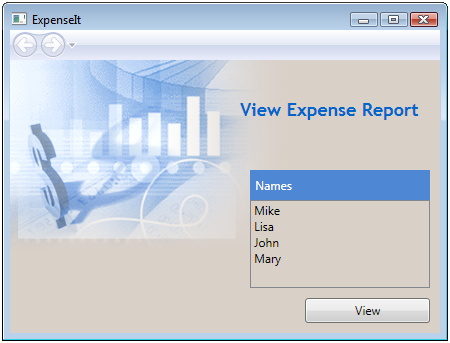
The idea is that you select a name on the list and click the button to view that person’s expense report. If you’re curious: the data displayed is hard coded as XML structured data in the HomePage.xaml file.

The first thing to do is to name the Button element in the HomePage.xaml file. To me it’s interesting that we already built and ran this app and yet nothing squawked about the button being an un-named element.

Being a Visual Studio-centric kind of guy I naively click on the button in the Design view and look at the control properties.

First I look for the “Name” property. Huh, not there.

Ok, next I look for the “ID” property. Double-Huh, that’s not there either?

To name the button you need to go to the XAML code and in the tag <Button add Name=btnView. Note that there is Intellisense support within the XAML code an the Button tag.

Now I want to wire the Click event.

Can I access control events in the Properties panel? No.

Can I double-click on the button in the design view to add a click handler? No.

However, I can add a reference to the “Click” property in the Button tag but this does not automagically wire up an event handler stub.

What I can do is this: rebuild the app (not just Build but Rebuild) so that the Name I gave the button is in-scope for Intellisense and then add the handler in the XAML file’s associated .cs file.

In HomePage.xaml.cs, I add the event handler by starting to type “btn…” whereupon Intellisense shows me the btnView and I add the event handler and let VS2005 create an event handler stub.

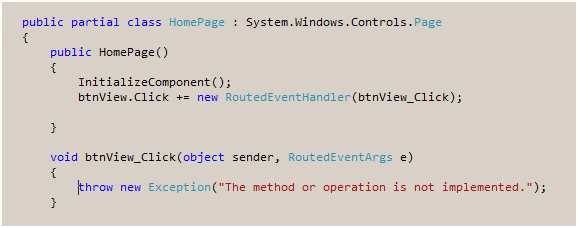
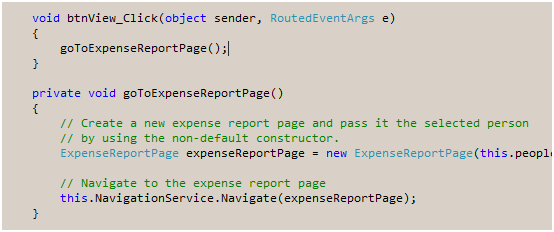
All looks ok – and utterly familiar. I then edit the handler to call goToExpenseReportPage() which I have already prepared and the application is finished.

Now let’s add a twist. Go to the event handler and select the btnView_Click name and select Refactor / Rename and rename the event handler any other random name. I used ShowExpenseReport. Rebuild the code and confirm the application still works correctly.

Mixing it up with Blend

Now open the same solution in Blend.

Select the button in the design view and select the events list in the properties panel.

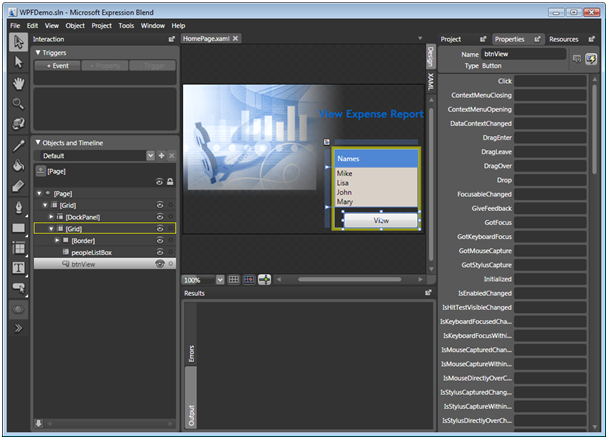
Note: from Blend’s perspective the button’s click event is not wired up. This is because Blend manipulates the application by only looking at a project’s XAML files, not its .cs files. Therefore, it is excruciatingly easy at this point to go ahead and wire the click event up AGAIN.

Just to make a point, let’s do just that. let’s wire up a second event handler to the button.

In Blend double-clicking in the click event box shown above wires up the event and creates the event handler stub in HomePage.xaml.cs. This sequence should open and/or foreground VS2005 to the created stub. We can add a call to goToExpenseReportPage() and the code builds fine but may, or may not, run fine. On some machines the second event handler fails when called because navigation has already moved to the second page, disposing of objects needed by the handler code so you get null reference errors.

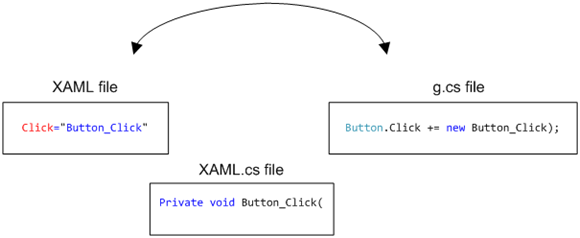
If we examine HomePage.xaml.cs we note that it still only shows the first event handler wired that we created with VS and does not show the connection to the second Blend created handler.

If we examine the XAML file we find the button tag has a reference to the Blend created handler (Click=btnView_Click/>) but no reference to the VS created handler. T add more confusion, the VS takes the Blend created event handler reference and generates the expected hookup in the generated file obj\Debug\HomePage.g.cs:

#line 81 “..\..\HomePage.xaml”

this.btnView.Click += new System.Windows.RoutedEventHandler(this.btnView_Click);

Again the #line directive redirects debug and error output.

Given that we’re building our apps with a combination of Visual Studio and Blend what should we do?

Blend/VS2005 recommendations:

  1. Use Blend to wire the events and create stubs. This means the event will be seen in the element’s tag in the XAML.
  2. Use the default name for the event handler.

Number 1 implies that a typical WPF app will have events and handlers referenced to controls in the XAML file, the handlers in the code-behind file, and actual code wire-ups of the events in the generated .cs files (the code-behind-behind files).

If you look purely at the code behind file (XAML.cs above) you are going to see the handlers with nothing more than their names to hint which control they bear on.

This is why I say (Number 2) renaming event handlers away from the default [control name]_[event name] pattern is a bad idea.

Why emphasize and favor using Blend? Currently Blend behaves in design mode the way we wish Visual Studio would. I’m sure this will all have to be revisited once Orcas ships but for now this is the approach I recommend.

XAML in WPF

At the beginning I made some claims that I would discuss XAML’s role from a more architectural point of view.

In architecture docs at MSDN I found two statements that seem to bear on this:

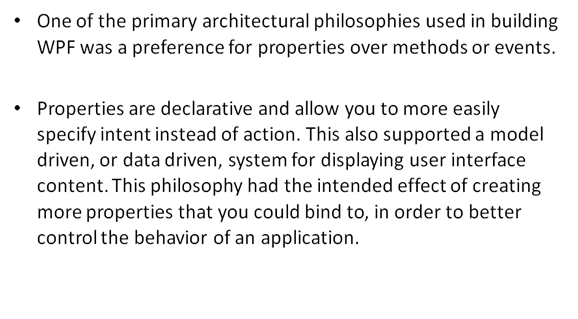
If you work the first half of Petzold’s Applications = Code + Markup, that is, the non-XAML part, you find that making a WPF is properties, properties, properties. Set the 85 bagillion properties of a Window, of a button, etc.

But look at it this way: properties are data. Data can be easily described by XML. Enter XAML. Once you have all the properties in your applications held in XAML it becomes really easy for any number of tools to traverse and modify this data.

We just demonstrated this by using Blend and Visual Studio to act on the same XAML files. The process is not perfect yet but it is a powerful technique I think we will see more and more often.

My little piece of Windows Vista

Posted in Campfire Stories, Windows Details on February 6th, 2007

null

“In addition to our summer and winter estate, he owned a valuable piece of land. True, it was a small piece, but he carried it with him wherever he went.”

From Woody Allen’s Love and Death.

So, what HAVE I been spending my time on? My little piece of the Windows Vista operating system.

For the last 20 months I’ve been building the digital locker assistant (DLA), a dedicated download client that works with Microsoft’s online digital locker, which is in turn part of Microsoft’s Windows Marketplace. Windows Marketplace is where that mysterious “Windows Catalog” link on your Start/Programs menu goes to.

Windows Marketplace supports direct browser based downloading. However, when the download is greater than 1-2 Gigabytes using the DLA is a much better way to go. The most popular use of the DLA so far has been buying and downloading entire copies of Windows Vista and Office 2007.

We were rather skeptical that users would want to download Vista or Office since they are really big downloads. However, earlier in the year the success selling and downloading super large games from Windows Marketplace convinced everyone that downloading Vista would be attractive to consumers. And indeed it has!

You can get the digital locker assistant two ways: If you have Windows XP, go to the Windows Marketplace website, create an account and download and install the MSI. It’s only a 1 meg download.

Or, it’s built into every copy of Windows Vista (except Server versions).

Actually building a part of Windows Vista was a huge effort but it’s really neat to install Vista and see my little piece in there. When I say “my,” it’s more like I’m using the Pluralis Majestatis, the Royal We. I was part of a team and We had LOTS of help.

I was the dev lead for the DLA for XP and Vista. Two very senior Windows developers with me at Vertigo, Chris Idzerda and Ralph Arvesen, rounded out the dev team (that is, they actually did most of the work). Initially, I was dev lead and PM but soon we needed more help with the process and got a full-time program manager, Anne Warren, who was also PM for the Windows Marketplace (WMP) website. The website dev team was some 15 developers and we had a build team of one (that should have been three). Our test team was in India so the dev/test cycle was almost 24/7, something like 24/6 – we’d hand off work in the afternoon and it would be tested all (our) night with a nice bug list waiting for us in the morning.

And then there’s the rest of the Vista team at Microsoft: really a cast of thousands. I think they ALL emailed me at least once. The High DPI functionality team. The Localization team (“do you know your UI looks really bad in Arabic?”), the Group Policy team, Remote Desktop team… you get the picture.

Let’s look at the app

In Vista there are two ways the digital locker assistant (DLA) may be invoked. The primary way is when you buy something at Windows Marketplace and it’s in your digital locker and you click “download.”

You may also browse to the DLA by finding it under the Vista Control Panel.

Then look under Programs or Programs and Features (using Classic view) and find “Manage programs you buy on line.” If you open this link you will invoke the DLA and if you have never sync’d up with your online digital locker you will see this:

If you have software in your online digital locker you can see it listed here by clicking on “Sign in if you already have a digital locker account.” Digital locker accounts are Windows LiveID (a.k.a. Passport) accounts mapped to a Windows Marketplace account. You’ll get a login prompt:

and after synchronizing with your online digital locker you’ll see all your purchased, free, and trial items listed. In my case (below) I clearly have a bunch of games in my locker. These were just to test downloading large items. Right.

Technology under the covers

The DLA is built in Win32/C++ as an ATL Windows application but we get some goodies from WTL as well. For those going “huh?” look at my post ATL and WTL resources.

At this point most people are asking me: why C++? Why not .NET and/or WPF? Or, if you’re using C++, why not MFC?

The DLA started (and is still available) as a downloadable application for XP. Our target users are what Alan Cooper would call “permanent beginners” (like that relative that always calls you for tech support…) — with a modem.

This means making the download as small as possible. Vertigo is a premier .NET shop but we could not use .NET because the 22 MB .NET runtime install kills us (that .NET never made it into the XP Service Packs… argh). Fortunately, we happen to have a few developers around (i.e., old geezers) who can do C++. We used ATL again to keep the size of the executable small.

In hindsight, it was just as well that the XP effort started in C++. Once we expanded the project to include being built into Vista we found that, in Windows System programming and the Vista source tree, C++ is expected and still king (See my post Has Microsoft flipped the Bozo bit on .NET? for a full discussion).

This meant that we could develop one source code base and, with some care, make it build in the Windows OS build system for Vista and VS2005 for XP.

Single source is nice but why not make a single binary that runs on Vista and XP? Sigh. We do — sort of, but it’s complicated.  From a programmer’s perspective, Vista makes one dramatic change from traditional Win32 applications and that’s in how localized resources are loaded.

To handle localization traditional Windows practice is to create an RC file for all resources (dialogs, images, sounds, strings, keyboard shortcuts, etc.) which are compiled into the resource DLL. Localization teams produce localized RC files based on your master RC file and these are all built into a suite of resource DLLs. At run time the application loads the appropriate resource DLL based on logic you have to write which looks at the calling thread’s locale settings.

Internal to the application is a language-neutral block of resources (typically English-US based) and if an appropriate external resource DLL cannot be found for the current locale settings, this internal block is used instead. This is known as “fallback” behavior.

Here’s the new twist in Vista: in Vista the OS loader (not the app) picks the resource DLL and locates it in memory where the app thinks its internal fallback resources are. This is expected behavior and currently only appears to work for a native Vista-built application so our “legacy” resource loading technique as used in XP was not acceptable to those who guard the Windows Source tree. Did I mention all the code reviews? Making Vista-style resource loading work in XP, while theoretically possible, was a task we did not choose to take on. So we ended up with one set of source code feeding two build processes; one for XP and one for Vista. Through careful coding there are remarkably few “if Vista do this, if XP do that” points in the code. 

While we currently block running the XP installer on Vista (in theory blocking installation of the XP DLA on Vista), it turns out that the XP DLA runs fine on Vista. I should not be suprised by this becuase we did quite a bit of casual sanity testing on this but it was not initially part of the test matrix. We found out by somewhat by accident as users were upgrading their XP machines (where the user had added the XP DLA) to Vista and then running the XP DLA.

For our downloading mechanism we hand off all download jobs to Microsoft BITS (Background Intelligent Transfer Service). While BITS works well for us I still think Micorsoft is tempting the gods by including “Intelligent” in their product name. BITS is the guts behind hwo Microsoft Updates are downloaded. I’ve also discovered that Google Updater uses BITS as well. What we gained by using BITS was automatic download management including background downloads, downloads that persist when our application is not running, downloads that seamlessly restart when the machine is rebooted, and lots of error handling algorthms that we did not have to write or maintain. I’d use BITS again if needed. We did have to build a simple HTTP download as well because some modem-based accelerators do not play nice with BITS.

Overall it was a great experience. While it was sometimes chaotic and exhausting, it was a lot of fun too. 

I’d do it again.

Really.

After I’ve had a couple years to rest.

Using a UDL file to generate and test database connection strings

Posted in Windows Details on December 19th, 2006

One of the most common gotchas to getting any data driven application working is the database connection string. How many times in your development life have you heard “I can’t connect to the database” and the problem ends up a minor detail in the connection string?

When I was working on a project with IdeaBlade one of the developers showed me a neat trick: keep a UDL file on your desktop. 

While there are whole websites devoted to connection string details, a simple UDL file on a Windows system gives you a really easy way to configure and test a connection string directly against the database you want to use.

In Windows the extension “.udl” is registered as a “Microsoft Data Link” and the default program is OLE DB Core Services. Not very intuitive so let me walk through the basics.

A UDL file is actually a text file so start by creating a text file on your desktop. Right-click on the desktop and select New and Text Document.  Note: I did this on Windows Vista but this works the same way on any modern version of Windows (I’ve checked as far back as NT 4.0).

Name your new file Connection.udl – or, whatever but you need the “.udl” extension. Ignore the “If you change a filename extension…” warning . The file will take on an icon appearance that is not a text file. Here’s how it looks on Vista

And XP

Now double click on (or right-click Open) the file.  You should see a familiar database connection configuration dialog.

To connect to your local SQLExpress database go to the Provider tab and select Microsoft OLE DB Provider for SQL Server.

Now go to the Connection tab and select the database to connect to. You may just browse through the list but SQLExpress instances do not always show up. You may also type the server name into the listbox. For SQLExpress it will usually be [machine name]\SQLEXPRESS if you have a full SQL 2005 instance installed it will just be the machine name. In this case I’m connecting to my local SQLExpress database on my machine HAVOCVISTA.

Select the authentication you want to use. If using a username and password choose whether you would like to embed the password in the connection string.

Now select the particular database. If the dropdown is populated when you click on it you already have a good connection. If not, then the problem is going to be the name and/or the authentication provided. Assuming all’s well, select the database and click the Test Connection button.

Now close by clicking the OK button.

Here’s the “Ah Ha” step.

Now open the file in notepad – remember, the .udl file is simply a text file. You should see something like this:

In the file is the connection string you just tested. Copy and paste where needed in your application and you should be good to go.