Layout Design


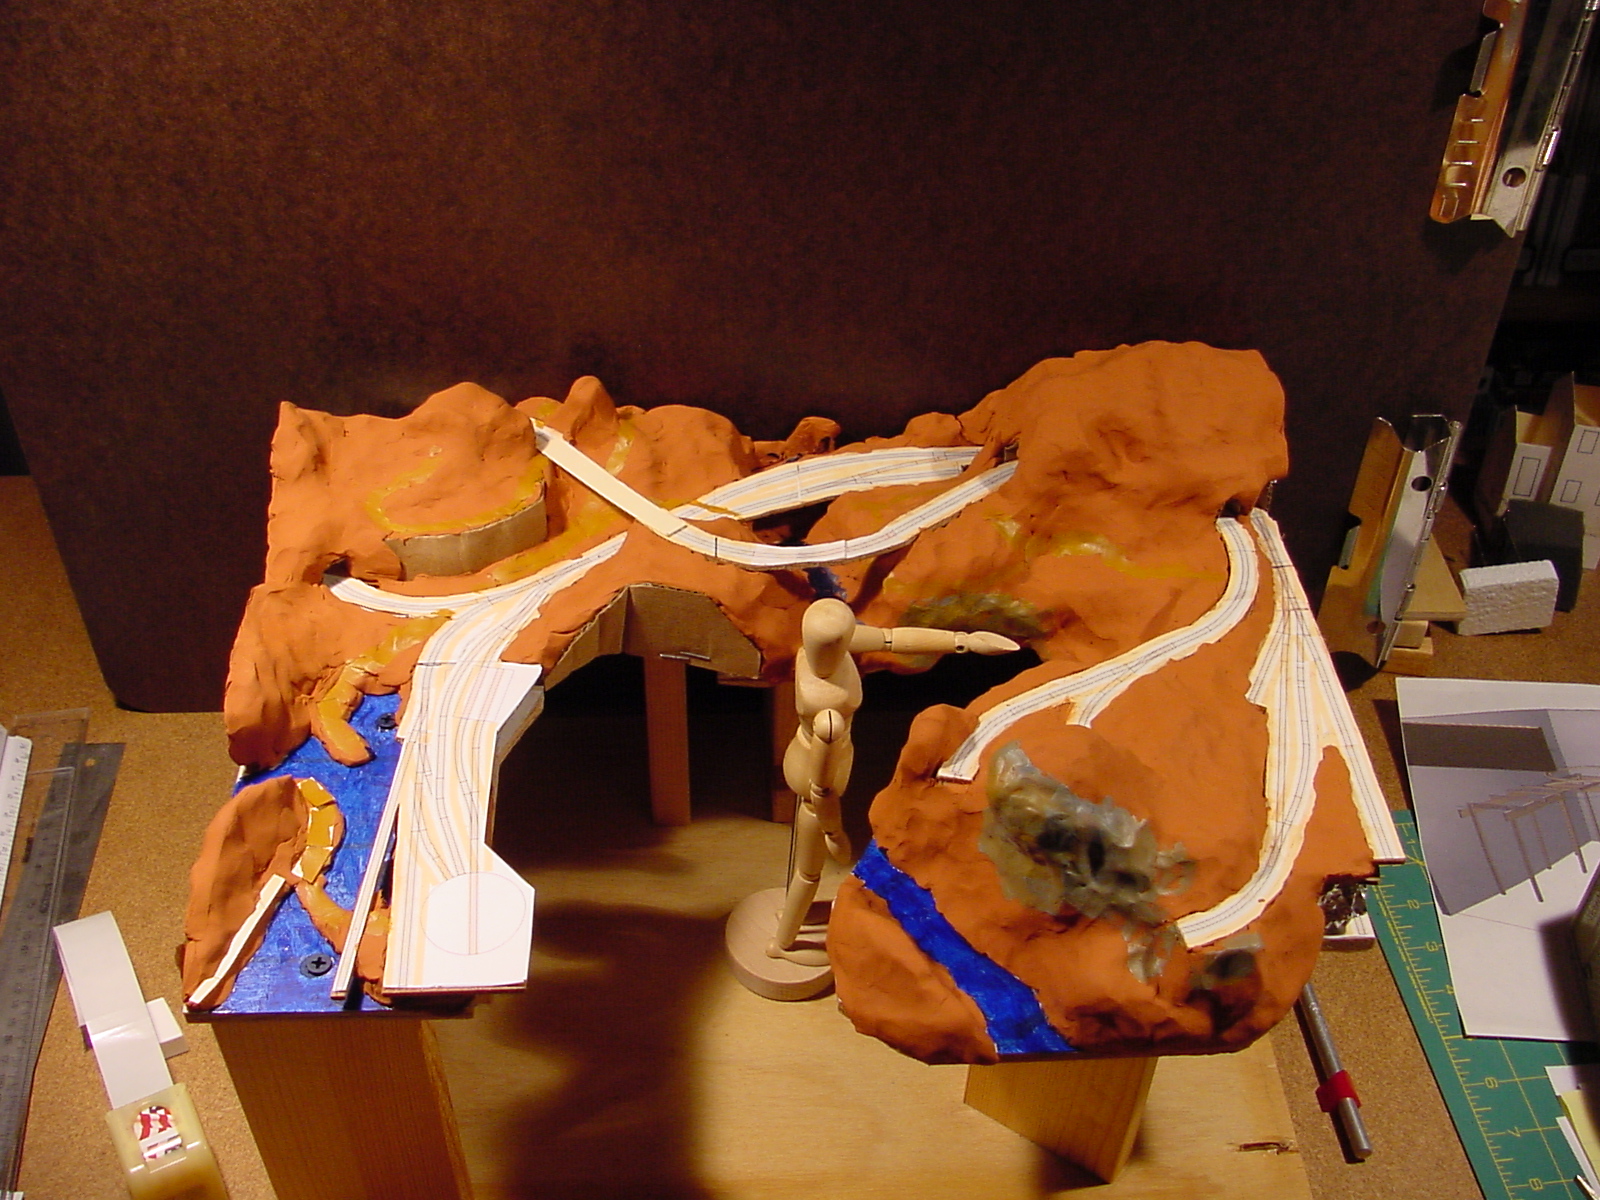
The locomotive is not just what makes the train go, it’s the thing that dictates everything about your layout: turntable size, minimum radius of curves (and turnout frog number), engine house size.

All of these are dictated by the size of locomotives you *want* to run. Availability of locomotives ends up dictating other crucial choices like the railroad being modeled and era – if you want to faithfully model a particular railroad during a particular time you can be stymied by the lack of appropriate model locomotives.

Why is this an obstacle? Of all the things a model railroad needs the locomotive is the one item that is the hardest to build from scratch. Therefore locomotives are the one item where the modeler is the most reliant on manufacturers and importers to supply what the modeler wants.

I model the 1920s and consider myself an advanced modeler. I have no problem building freight cars, passenger cars, houses, boats, bridges, track, power supplies, DCC electronics, layout wiring, etc.

But scratchbuilding a locomotive worries me — mainly because it is so easy to do it badly. The level of precision and design required in making a reliable mechanism (especially in the smaller scales) is very high. For this very same reason, there are only a fairly small number of mass-produced locomotives available.

It is an expensive proposition to bring a mass produced model locomotive to market. In the 1960s, as labor costs rose and the quality and detail demanded by the modeling consumer rose it became extremely expensive, and therefore extremely risky for manufacturers to bring new models into the market. From the 1970s through the early 1990s there were very few new mass produced models introduced.

During this period the batch production brass market thrived. These importers reduced the risk of bringing out a new model by making small batches. While the cost for these items was high, so was the quality.

A recent change is that China currently provides very cheap labor for manufactured goods and this has been applied to the production of mass produced model locomotives that sometimes approach the quality of batch-produced brass models but at 10-20% of the cost (hundreds of dollars versus thousands of dollars).

Despite this opportunity I do not see manufacturers taking advantage of this situation by bringing out a wider range of locomotives. Take for example the fact that there are now at least FOUR models of the 4-8-8-4 “Big Boy” available (Trix, Athearn, Precision Craft, Rivarossi), two USRA Mikados, etc. I agree that there are more new locomotives available, but it seems like manufacturers are still being very conservative.

In the HOn3 Group at Yahoo! (http://groups.yahoo.com/group/HOn3/) there was a thread going about what eras people model and what models get commercially produced. In particular there were calls for more (or ANY) early narrow gauge locomotives in HOn3 such as basic Baldwin 4-4-0s and 2-6-0s.

These small engines were popular on narrow gauge lines from their beginnings in the 1870’s-1880’s through to around WWI. By then, most surviving narrow gauge railroads had started moving to heavier motive power: 2-8-0’s, 4-6-0’s, and especially big 2-8-2’s typified by the D&RG K-class engines. These later, larger engines are really just about all you can get in HOn3.

Has anyone tried making HOn3 engines produced in China like Bachmann’s excellent HO models? Yes, and guess what they produced: D&RG K-class Mikados.

Why be so conservative?

Maybe it’s the customers fault? In the same thread on the HOn3 group mentioned above several people estimated that a retail price for a classic 3-foot gauge Baldwin 4-4-0 would be $250 with a “street price” of something like $150. This tracks closely to the pricing of Bachmann’s new modern standard gauge 4-4-0s.

When the same group was asked how much they would be willing to pay for a classic 3-foot gauge Baldwin 4-4-0, the response seemed to be “much less than that.”

I can see that marketing to model railroaders is not for the faint of heart.

I’ve had several people write me and ask if I think they should buy 3rd PlanIt because they like the plans I was able to make with it.

3rd PlanIt (3PI) (http://www.trackplanning.com/) is a CAD system strongly optimized for drawing model railroad track plans. I’ve been using it off and on since 2000 or so. I was a semi-experienced AutoCAD user many years before that.

The Good:

  • I designed my layout and continue to maintain the plan as I build in 3PI. It has been stable and productive for me to use. I use version 7.10.006 which was released March 2, 2004.
  • I find the feature set of 3PI powerful and fun to use.
  • If 3PI was being maintained I would recommend it highly.

The Bad:

  • No updates were been released between early 2004 and early 2007.
  • 3PI is the product of one man, Randy Pfeiffer. I truly believe his work is very good (again — I’m a happy user) but it can be a problem when a company is essentially one person. Occasionally Randy gets committed to other tasks such that purchase orders sometimes do not get processed in a timely fashion.
  • NOTE: (February 2007) Version 8 has been released!! In April 2005 the next version, 8.0 was coming “soon” and Randy Pfeiffer gave a detailed view of what he had been running into as he implemented threading to 3PI. I’m a Win32 C++ developer myself and his commentary looks legitimate. See his posting at the Yahoo! Group 3rdPlanIt : 3rd PlanIt Users Group

Bottom line:

NOTE: (February 2007) Version 8 has been released!! I like the product. It took a long time for Version 8 but it looks good. I can now recommend that other people buy 3PI.

This stage of layout design borrows heavily from architecture and theater. Indeed, examining the definitions of these words you get:

Architecture: The art and science of designing and erecting buildings.

Theater: (the most appropriate of the many definitions) A place that is the setting for dramatic events.

For me these definitions exactly span what model railroad design and construction is and combining them gives a good working definition of model railroading:


Model Railroading: The art and science of designing and erecting a place that is a miniature setting for dramatic events involving trains, terrain, and associated human activities.


When is it the right time to build a planning model? Really, whenever you get a point where you feel you need to “see” things better to proceed deeper.

As I mentioned before I used the 3rd PlanIt CAD program to design my trackplan. While 3rd PlanIt has decent terrain design and 3-D visualization capability, I found it would take me a very long time to use it to design the terrain of my layout so I used the CAD program to design just the track plan and benchwork plan. I decided to use a planning model to work out the way hills, valleys, and streams would work out on the plan.

I chose a large scale: 1:8 to use for the model. This means 1/8” = 1″ (1.5 inches = 1 foot). I happen to have an artists model figure which is about 5 feet 6 inches in height in this scale.


Using the CAD program and my printer I made patterns from cardstock (manila folder paper) and transferred the shaped to ¼” plywood which I cut out with a jigsaw. The ¼” thickness is not important – it’s just what I had lying around in scrap. I used some 1 x 3’s as pedestals to set the scale height of the sections.

As you can see from the photos I broke the layout up into four sections. While the layout is not portable, it needs to be moveable. The height of each section is defined by the lowest terrain planned in that area. I followed to basic height/depth plan Furlow used for his San Juan Central but offset everything higher for my track zero height of 53.5 inches from the floor.


I glued a scale printout of the trackplan onto a sheet of 1/8” plywood and cut the plan out cookie-cutter style out of the thin plywood (this simulated the roadbed roadway I would eventually make for real out of ½” plywood). Then I glued a printout of the trackplan onto the layout sections and used wood screws as risers for the roadbed.


At the time I was worried I had done everything accurately enough. Comparing the model above to the current state of the layout it looks really close.


To actually model the scenery I used Sculpey (http://www.sculpey.com/) which is modeling clay that can be adjusted and shaped indefinitely and then hardened by baking in an oven (275 degrees and 15 minutes per ¼” depth). My model is big but fit nicely in our oven.

I used balls of aluminum foil to create the basic hill shapes and then covered the foil with a skin of Sculpey. Later I used acrylic paint to indicate areas that would be roads and water.


The completed model

Malcolm Furlow’s San Juan Central (SJC) flipped right-left so it matches the basic configuration.

In general I followed the terrain of the SJC since I really liked the SJC looked.

Here I have the figure pointing to the Crazy Horse Bridge.


Tiburbon (a play on the name of the real town of Tiburon, California).


The back of the layout and the Two Tunnels area.

Between this planning model and the CAD track plan I had worked out enough of the details to proceed with construction of my layout. I really found this step a lot of fun and while I feel it is a required step to building a layout I could see building a few of these for fun just to try out different ideas for layout design.

When I first decided to build a new layout I considered a shelf type plan. “Shelf” layouts have become popular for several reasons. They tend to maximize mainline length while avoiding being able to see too many adjacent runs of track. Shelf layouts were probably a direct and strong swing away from layout designs known as “spagetti bowls.” Operations oriented model railroaders — those for whom operating trains in a prototypical fashion is most important — have increasingly turned to shelf style layouts. Many layout builders also stack shelves with two or even three levels being common.

Interestingly, John Allen was a huge fan of operation and yet his layouts were firmly in the NOT a shelf, “bowl of spagetti” camp.

For my available space I initially planned a shelf layout with loops at either end and two levels at one end.

Initial shelf layout idea

As you can see I made a 1” = 1’ scale model of the room and my layout idea. The Layout is roughed out in classic “Armstrong” squares and blobs. Squares and Blobs refer to a technique the late John Armstrong popularized to rough out the mainline location and space requirements of a layout for a given space.

The track height would be rather high: 53.5 inches above the floor because I like the trains near eye level and this was the height of an existing shelf in the closet onto which I would flow the layout. In my planning model, the pieces of paper on the floor represent pieces of furniture that would be under the layout. In some cases they are bookcases that the layout would have gone through.

Loop in closet

In the closet would be one loop and one terminal (above). At the other end (below) the layout would split into two levels with a loop on the lower level.

Bi-level portion
This plan had maximum mainline length – almost two scale miles. Huge yard area and would have presented good operational complexity.

However, I am so glad I made this simple cardboard model because once I did, I realized I hated this plan.

For me the biggest problem with this design was that there would be no immersive scenery experience. I knew that in photographs this layout would only look good when you looked at it focused on small scenes. Any long views would glaringly show that this was a shelf running around a room with trains on it.

This was the tipping point. I had been dreaming of building a version of Malcolm Furlow’s San Juan Central (SJC) for almost 20 years so I figured I’d see how that would fit into my space.

SJC sketched in

I saw that I’d want to flip the SJC left-right and I could run track out to storage tracks in the closet. Setting an early CAD drawing of the layout into the space I could see I that this plan felt much better. The picture above might make you think I could keep the dual level part at the bottom of the picture but one of the “costs” of this design change was that my desk would no longer fit under so I had to move my desk, my workbench, and several bookcases into the nook.

With SJC CAD laid in

Postmortem: I’m really happy with the choices and my new little nook office is actually really nice and effective.

Permanent page: The Track Plan

I based my track plan on Malcolm Furlow’s 8 x 10 San Juan Central.

Click for larger view

However I made the following changes:

  • Flipped the track plan right-to-left because that fit the room I was building in better.
  • Changed the plan to HO standard gauge with 18” minimum radius curves.
  • Specified #5 turnouts.
  • Set track “zero” height at 53-1/2” above the floor.

Because HO needs more “shoulder room” than HOn3, 18” radius turns and #5’s are bigger than the 16-18” turns and #4’s of the original plan, and because the room can fit it; I increased the size of the layout one foot on the long axis so my plan is 8’ x 11’ and is fit into a 10’ x 14’ room.

As far as the schematic layout of the tracks, curve for curve, tunnel for tunnel, bridge for bridge, the only change I made was to completely redesign the tracks at Montrose, turning it into a seaport (Tiburbon on my layout) and add a wye behind Tincup leading off through a bookcase to staging tracks in the corner.

Like the Frenchman’s Axe: the handle replaced three times, the head replaced twice, but still the same axe – I consider my plan to be largely the same as Furlow’s SJC despite all my tweaks.

I used the 3rd PlanIt CAD system (http://www.trackplanning.com/3pi.htm) to draw my track plan. Once you are up the learning curve, CAD systems offer many benefits. I’ve had work related experience with CAD systems and while 3rd PlanIt is not flawless it is certainly good enough to have been a great help in planning the layout. I would recommend it to others and there are two good Yahoo! Groups that provide community support:

3piusers • 3pi CAD Users
http://groups.yahoo.com/group/3piusers/

3rdPlanIt • 3rd PlanIt Users Group
http://groups.yahoo.com/group/3rdPlanIt/

Where did the CAD system help me the most?
Drawing the initial plan of your layout feels really hard in a CAD system compared to pencil and paper – so much so that you can begin to wonder if CAD is really the way to go.

The answer (for me) is YES, and here’s why: Plans change.

The initial CAD drawing may take longer to get down the first time than a cranking out a similar pencil and paper drawing but CHANGES to your plan are where the CAD simply kicks butt.

Here’s an example. I based my first draft using Walther’s Code 83 #4 turnouts. Then I went to order them. Turns out Walthers looked like they were going to be out of stock for weeks or months on those items. I changed course and decided to use Central Valley #5’s instead.

Using pencil and paper it would have taken me many hours to redraw the layout with different turnouts. In 3rd PlanIt it took less than an hour to make the change.

The other good thing a CAD system does is add up things like total track length, number of left/right turnouts, and tallies up the amount of lumber needed. I was able to get everything I needed in one trip to the lumber yard. I only had to go back once to buy one more 10-foot 1×4 because I made an oops and forgot to leave myself a long piece.

Stop when it’s Good Enough
3rd PlanIt has fairly deep terrain generating and editing capabilities but at that point in the process I made the decision that the time-to-benefit ratio was not good enough for me to go deeply into that on my plan. I used a modeling clay model of the layout to work out the 3D aspects of the scenery (I’ll write about that in a future post). However, I did use the CAD to make the templates for the model-of-the-model.

My plan and a 3D view appear below:

I based my layout on Malcolm Furlow’s San Juan Central in HOn3 as descibed in his MR articles and his book HO Narrow Gauge Railroad You Can Build: A Narrow Gauge Project Railroad.

Starting in the November 1983 issue of Model Railroader and finishing in August 1984, Malcolm Furlow explained how he designed and built the San Juan Central in HOn3. Soon Kalmbach published the articles in book form as HO Narrow Gauge Railroad You Can Build: A Narrow Gauge Project Railroad.

This is a scan of the cover of my (now very tattered) copy I bought in the late-1980′s while working at a model train store in LA.

Long out of print, used copies currently run $60-80.

Malcolm displayed his approach to building layouts — the good and the bad — in this book.

The good:

Modest Size — The San Juan Central is only 8 x 10 overall. Fits into most common bedroom-size rooms of average homes (good for me!).

Strong visuals — Malcolm’s design emphasizes strong visual elements and is literally built for photography.

Vertical over Horizontal — Drama is created by nearly 30 inches (0.8m) of vertical separation between the lowest and highest locations on the layout.

The bad:

Tight turns — As designed, the SJC minimum radius is 15″. What I know of how Malcolm works makes me suspect the trackplan was made on the fly and that the actual layout has even tighter turns but the plans were later redrawn with 16, 17, and 18″ radius turns.

Limited operational possibilities — The SJC emphasizes spectacular scenery. Combined with modest size this means there are not many different ways to move cars and trains around the layout.

“Bald spots” — The SJC has some places that don’t work very well. They tend to be transitions between different spectacular views of the layout.

Photos

overall

Overall view of the San Juan Central

Top (click for larger view)
Top view

What happened to it?

The SJC is currently owned by Charlie Getz who has lovingly restored it to better-than-new condition. Charlie hosted vistors during the 2004 National Narrow Gauage convention in Santa Clara, California and I have several photos of it online.

Of all the different gauges and scales to choose from, why HO? It was a really tough choice. Permanent page: Why HO Gauge?

There are lots of scales people use to build their layouts. When I actually started the project and said to myself “I’m pulling the trigger on building a layout today” I limited my choices to

HOn3
HO
Sn3
On30

Constraints and Influences

Physical properties of the scales

The larger scales (1:48 or larger) allow better detail and generally your model trains will have better operating characteristics. The smaller scales (1:87) allow more terrain, allow more scale miles of track for a given space, take more work to detail and more work to operate well. Sn3 is truly in the middle.

Space and concept:

As I discuss elsewhere I want to build a layout that borrows heavily from Furlow’s HOn3 San Juan Central. This layout was 8 ‘ x 10′. I could fit a layout only slightly bigger than that into my available space. This tipped me towards HO or HOn3 (call it one unit of tip “towards”).

Experience

I built a small (30″ x 8′) HOn3 layout and have several pieces of HOn3 rolling stock. The trains are cute, sometimes only a bit larger than N scale. However, good operation was tough. Call it a wash.

Detailed Models

I’m a long time reader of Narrow Gauge & Shortline Gazette. Really the majority of the fine work seen in a typical issue is in larger scales. There is currently a pretty good variety of structures, a great variety of On3 rolling stock and scratchbuilding materials. On30 has a lot of energy in it these days and I love the slightly less formal atmosphere of the On30 comminuty. This tipped me towards On30 (call it one unit of tip “towards”).

Vehicles, Figures

I love model period vehicles and I want to have a full model population of figures. There is an “ok” variety of figures but a deplorable shortage of vehicles in 1:48. Yes, yes: you can use 1:43 vehicles modified but if I’m in O scale I’m going to be wanting a bit more fidelity and there’s 10% difference in size between 43:48 (call it one-half unit of tip “away”).

In HO: Lots of vehicles in the late-20′s to mid-30′s timeframe I’m looking at. Lots of figures (call it one-half unit of tip “towards”).

What do I already own?

I have many classic HO structures, a couple O scale structures, many HO standard gauge kits, several HO locomotives, one HOn3 boxcab engine. This says: HO and HO standard will be cheaper to get going. Additionally, some of these HO kits are what I’ve always wanted to have on a layout and I have them *now* (call it one unit of tip “towards”).

HO wins so far: Narrow or Standard gauge?

I love narrow gauge but I the models are small. Bachmann (with a bit of help from Life Like) now provides excellent low cost small and medium size steam engines that look and run great — and I already own several.

One of the key goals is to actually get this layout BUILT and RUNNING. So I’m going with HO standard gauge.

What price am I paying?

I believe projects turn out best when you acknowledge your compromises and confirm to yourself that you are really okay with them. Then, embrace them as guides. Boone Morrison wrote something I really agree with when he explained why he was moving from HOn3 to On3:

“HO is a great scale to build a model of a railroad, O scale is a great scale to build railroad models”

DS 1/25/2006

« Previous Page